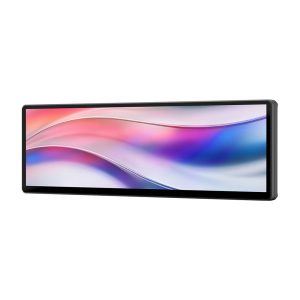
How to use the Corsair Xeneon Edge as a dashboard for Simracing
10. April 2026
The Corsair Xeneon Edge is a versatile and dynamic device with countless uses. One of these is as a dashboard for sim racing, for which there are two options: via iCUE using our special SimHub widget, or as a separate monitor. We’ll walk you through both methods in detail here. Let’s get started.
Option 1: Xeneon Edge SimHub Widget
To make your life easier, Fanatec has created its own widget that can display any dashboard in SimHub on the Xeneon Edge via a widget. The main advantage is that, like any widget, it can be resized so that you can arrange it alongside other widgets.
Make sure iCUE and SimHub are installed and fully updated.
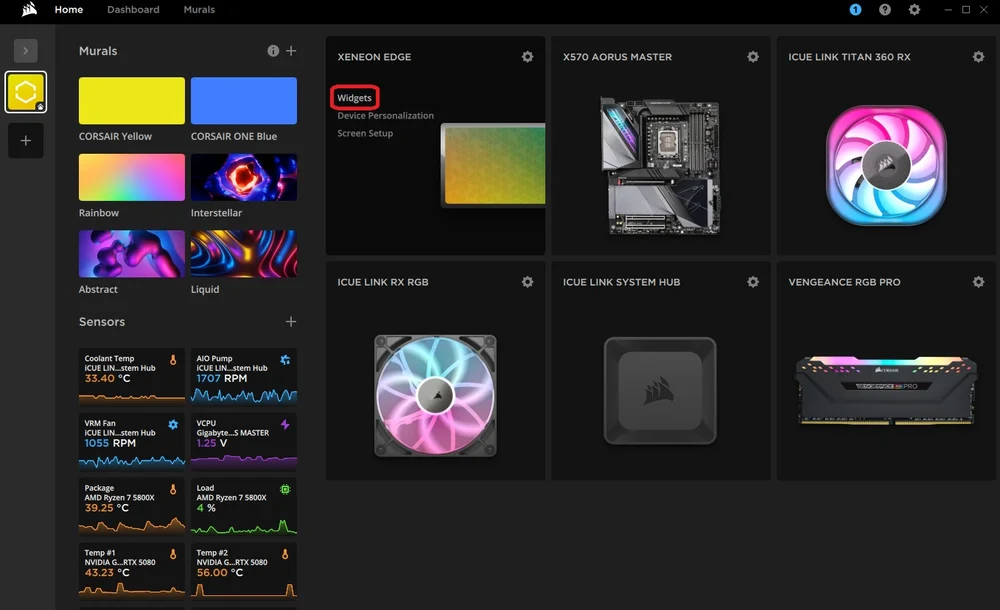
Open SimHub and iCUE.
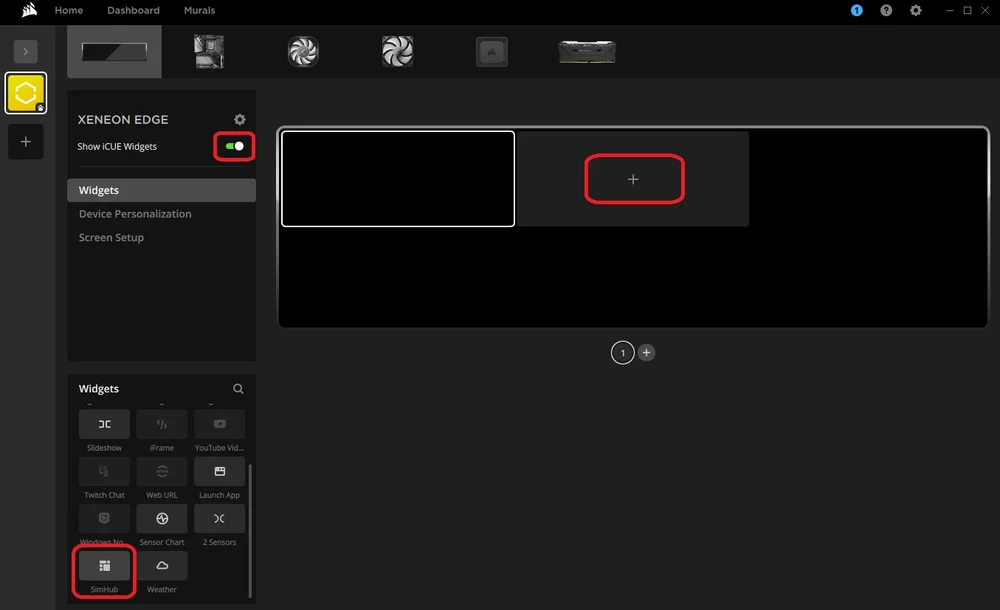
From the iCUE home screen, hover your mouse over the Xeneon Edge module and click on “Widgets”.
Enable “Show iCUE Widgets” here and click on the empty “+” field in the currently empty preview.
Now scroll down in the menu on the bottom left until you find “SimHub” and click on it.
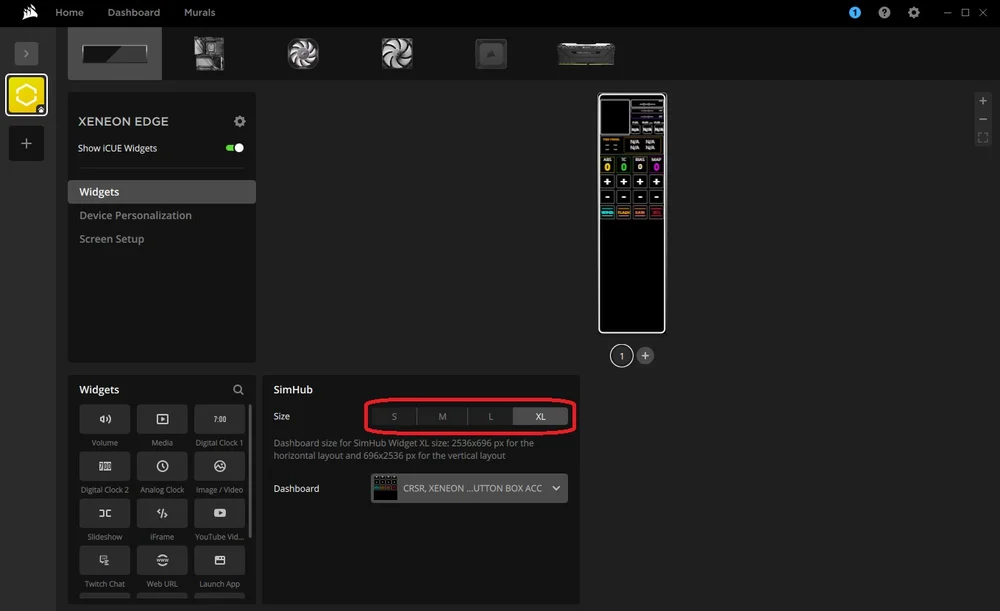
After that, the widget will appear on the screen and you can select the size as well as the desired dashboard.
The size depends entirely on which dashboard you use and which other widgets you want to display next to it. You will notice that each size option in iCUE comes with a specific resolution so that everything fits perfectly. Make a note of these if you want to create or edit a dashboard in SimHub’s Dash Studio. (More on that later)
To give you a starting point, Fanatec has created a compact dashboard specifically designed for the “Medium” widget size. Download it below.
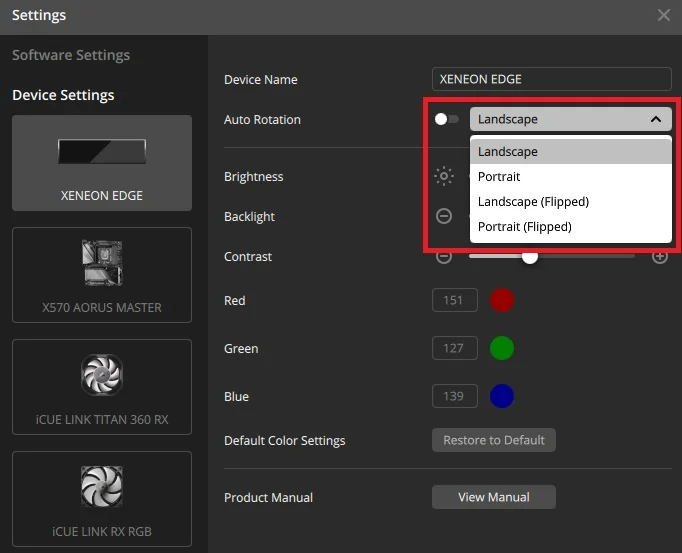
Additionally, depending on your chosen dashboard, a vertical orientation of the Xeneon Edge may be the better choice. By default, the screen rotation automatically adapts to the orientation of the Xeneon Edge. Alternatively, you can change this manually by going into the settings, disabling “Auto Rotation,” and selecting the desired orientation from the dropdown menu.
Option 2: Using the Xeneon Edge as a separate monitor
Since the Xeneon Edge can be used as an additional monitor, you can place the dashboard of your favorite sim racing game there if you do not want to use iCUE.
Go to the SimHub website and download the latest version of SimHub. Follow the instructions and install it on your system. After that, SimHub will open and you can set up the Xeneon Edge as an output device.
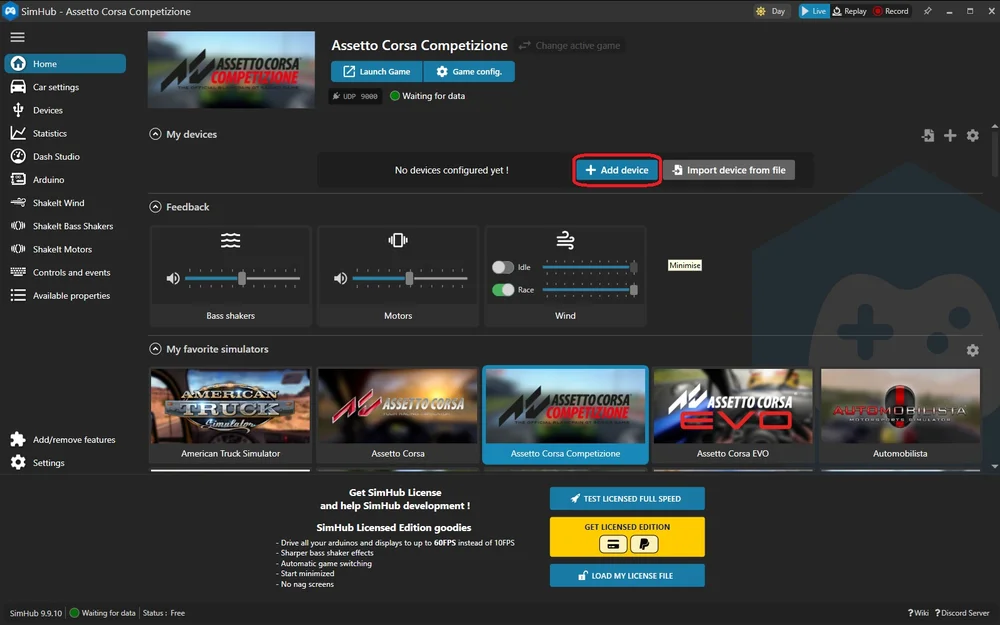
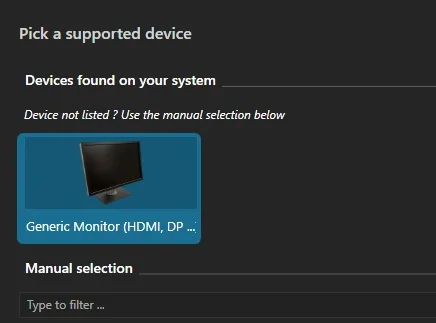
On the SimHub home screen, you will see the “My devices” tab. Click on “Add device”.
Click on “Generic Monitor”. This will open a menu where you can define one of your connected monitors as the default display for the SimHub dashboard.
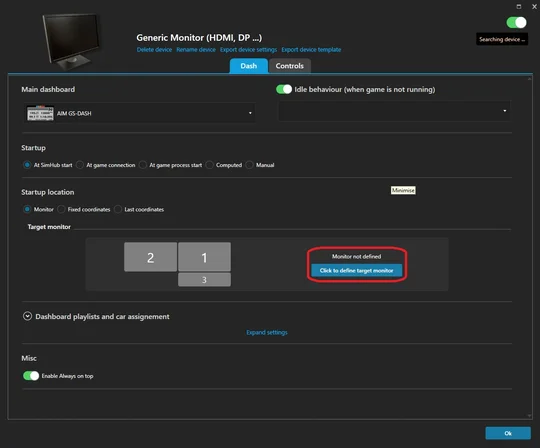
Here you will see a representation of your monitors and their positions. Select “Click to define target monitor”.
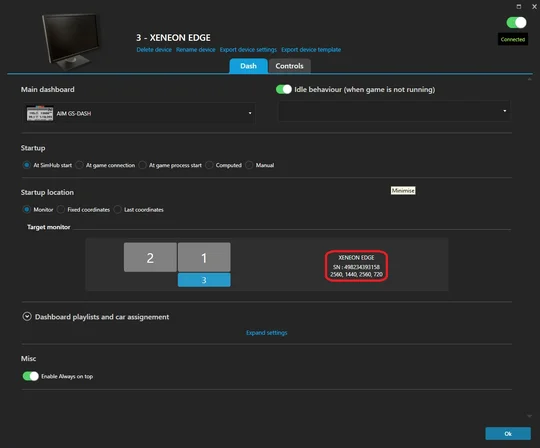
A window with the same monitor overview will open. Click on the long, narrow monitor labeled “Xeneon Edge”.
Now SimHub knows that the dashboard should be displayed on the Xeneon Edge. There are additional settings that allow you to control when and how the dashboard runs on the Xeneon Edge. For example, you can have it start automatically when you open a specific game, or use different dashboards depending on the game.
How to create a dashboard for the Xeneon Edge in SimHub
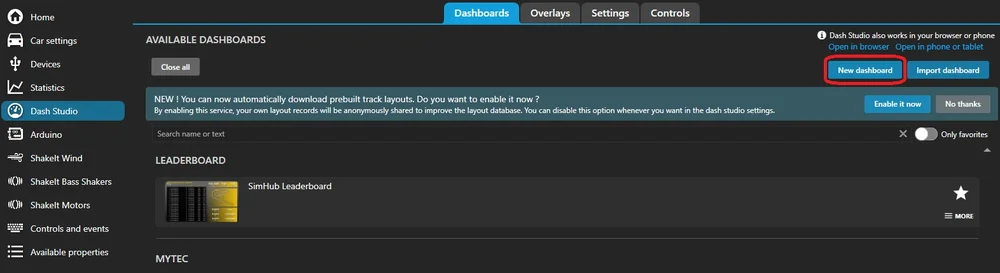
Since dashboards are basically small applications that run on a screen, creating a dashboard for the Xeneon Edge works the same way as for any other monitor. Open Dash Studio to create a new dashboard.
Click on “Dash Studio” on the left in SimHub and then on “New dashboard” on the right. This will open Dash Studio in a new window.
You will now see a new, empty template. However, due to the unusual size and aspect ratio of the Xeneon Edge, you need to adjust this template.
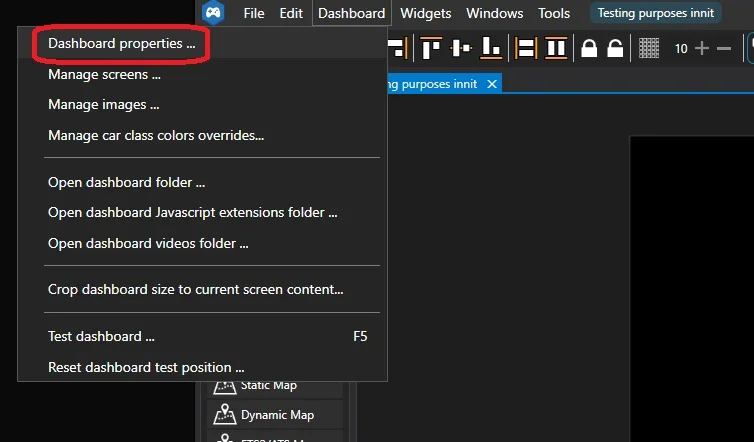
Click on “Dashboard” in the top left and then on “Dashboard properties …” in the submenu. This will open the “Dashboard Properties” window.
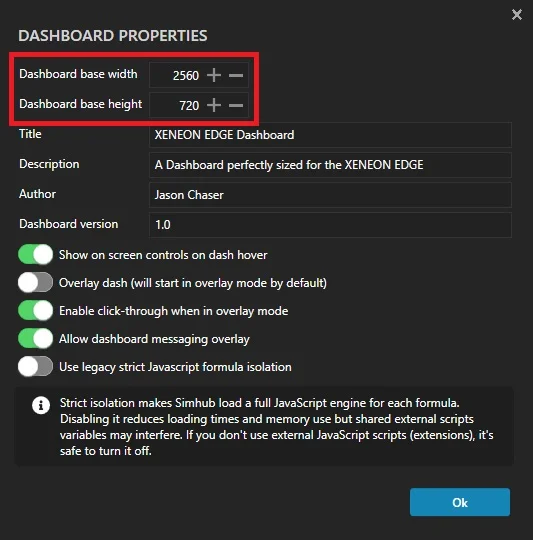
Set the “Dashboard base width” to 2560.
Set the “Dashboard base height” to 720.
Then enter title, author, etc. and click on “Ok”.
Note: If you want to create a dashboard for use as a SimHub widget in iCUE (instead of as a monitor), the width and height differ depending on the widget size:
SimHub Widget S: 840x344 (horizontal) or 696x416 (vertical)
SimHub Widget M: 840x696 (horizontal) or 696x840 (vertical)
SimHub Widget L: 1688x696 (horizontal) or 696x1688 (vertical)
SimHub Widget XL: 2536x696 (horizontal) or 696x2536 (vertical)
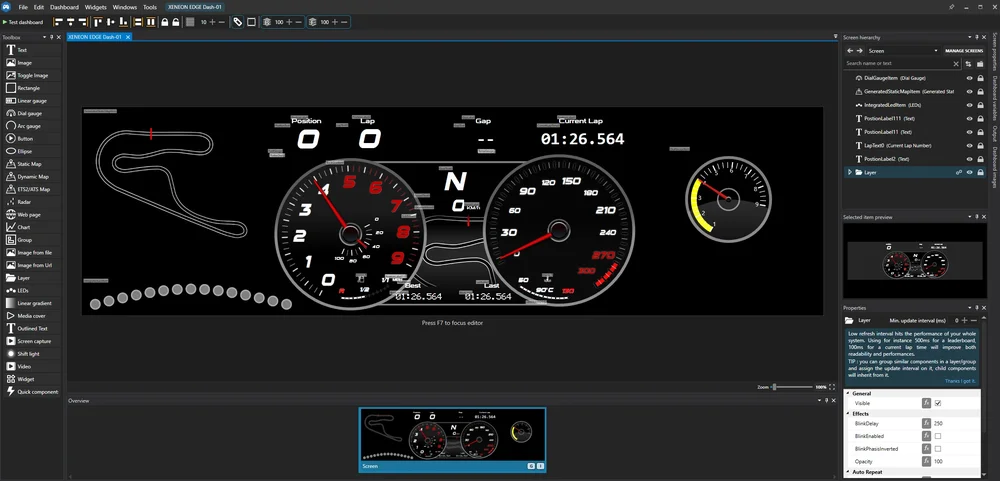
Now your template has the perfect size for the Xeneon Edge and you can use the toolbox on the left to add elements and create your own dashboard. A good place to start is to choose one of the pre-made dashboards from the Dash Studio main menu.
Click on “MORE” on a dashboard and then on “Edit Dashboard”. This will open it in Dash Studio and allow you to adjust the size accordingly.
This shows you how many possibilities there are for creating a dashboard, and the additional width of the Xeneon Edge offers significantly more functionality and creativity than a typical 16:9 monitor.
Creating a Button Box for the Xeneon Edge
Thanks to the 5‑point capacitive touchscreen, the Xeneon Edge can also be used as a button box. And in a much more versatile way than usual, since you can position buttons freely and customize them depending on the game.
Creating a button layout in SimHub can be demanding, but it is worth it. Button boxes can be real game changers and offer you a practical interface—especially since sim racing games have an enormous number of key bindings. We will not even get started on flight simulators.
Fanatec has already created a template for Assetto Corsa that you can use as a starting point. Due to its width, the Xeneon Edge works best as a button box in vertical mode.
However, since SimHub profiles work differently, this template is not completely plug-and-play. You need to link the inputs in the profile yourself with the key bindings in the game. This applies both to your own templates and to this one, since these bindings are system- and user-specific.
How to connect SimHub controls to in-game keybinds
Using Assetto Corsa and the template as an example:
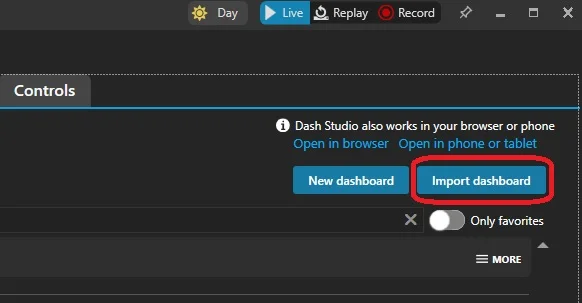
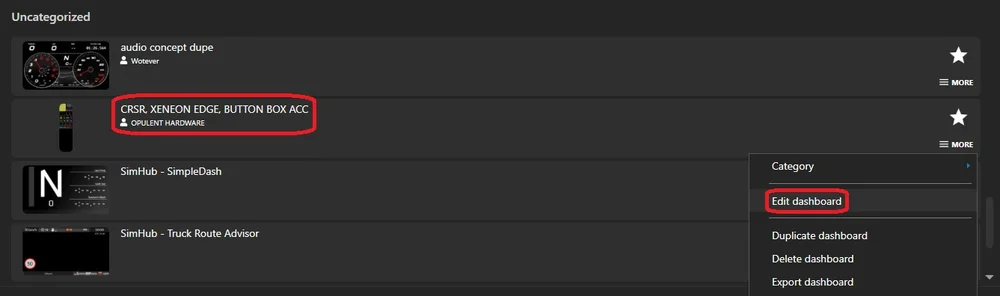
Open SimHub and go to “Dash Studio”. Click on “Import Dashboard” on the right and select the downloaded file.
After importing, you will find the profile (probably under “uncategorized”). Click on “More” and then on “Edit dashboard”.
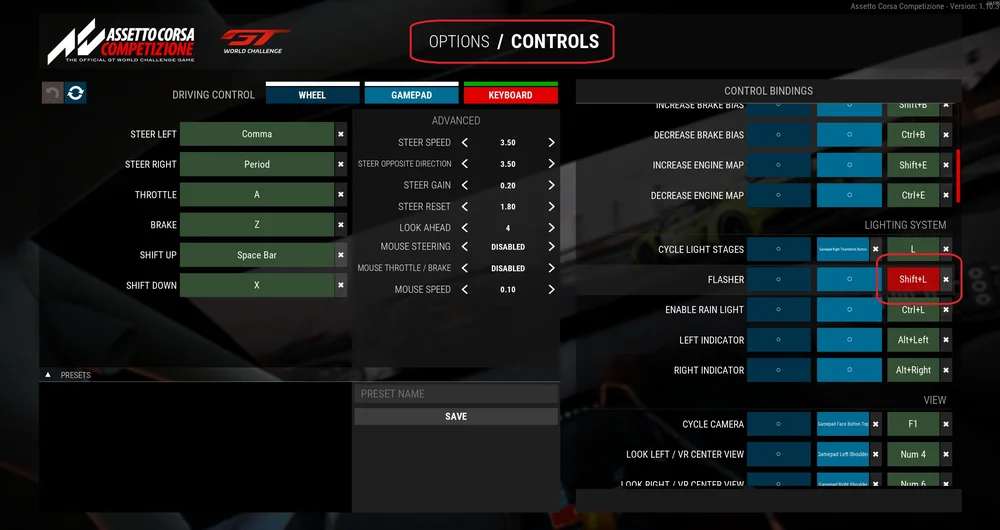
It can be helpful to open the game at the same time to check the key bindings—ideally on a second monitor.
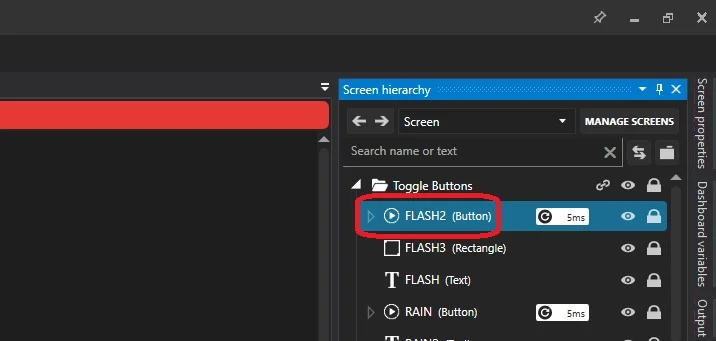
At the top right you will see the “Screen Hierarchy” tab (similar to “Layers” in Adobe Photoshop). This can contain a very large number of elements, so it is advisable to organize everything into folders.
Open the “Toggle Buttons” folder. Ignore everything without “(Button)” for now.
When you click on a button, the “Properties” tab will appear at the bottom. Scroll to the “Button” section.
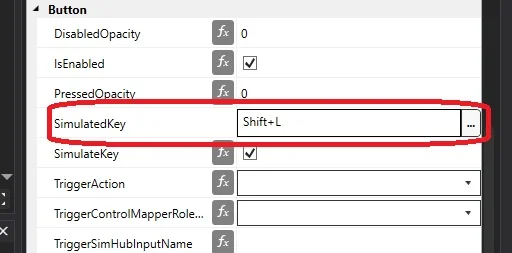
Two options are important: “SimulateKey” (checkbox) and “SimulatedKey” (key assignment). First enable “SimulateKey”. This makes the button behave like a key press (similar to a macro). Then click in “SimulatedKey” and press the key or key combination that is already assigned in the game to the desired function.
If you now press the button, that key press will be simulated—the game will recognize it like a normal key press.
Please note: If you later change the key bindings in the game, you will need to adjust the mapping in the SimHub profile again.